So, despite the magical Autumn feeling high winds can create, they also can create some serious damage. On October 27th, the winds whipped through the Los Angeles area at top speed!! It started at about 3pm and then escalated through the night. At one point (about 8pm), I was afraid our sliding glass door was going to be blown inward. Needless to say, I was heavily concerned about my garden the whole time and could not wait to get over there the next day, to check on what had happened.
When arriving at the garden on Wednesday Morning, October 28th, I instantly saw my trellis nearest the entrance, had fallen onto the stalks, fox glove and snap dragons on the other side. Initially, from the looks of things, I thought their was a lot of major damage. However, after removing the trellis and debris, I assessed the damage clearly and found things were not as horrible as I had anticipated.
The casualties were mainly snap dragon flowers and the fox glove. The fox glove in particular took the worst beating from the trellis. It was smashed pretty intensely and several flowers were crushed. I only lost about 3 stalks at the front though. And, all of my seedlings, even around the fallen trellis, were fine! Thank goodness.
I think the most disturbing part, after the flower damage, was the amount of trash and cigarette butts that had flown into my beds from the VW mechanics smoking on the street in front of my garden. City gardening. What can I say? You only have so much control when your in a community setting and then, add the fact that my garden beds are literally flush up against the street. This definitely equals the need for a lot of letting go.
And yet again, like in my first day of planting my winter garden writings, I am reminded that we only have so much control over our circumstances. Sure, we can research, plan and plot all we'd like about our pregnancies and gardens, but in the end, mother nature prevails. Her power greater than any mortal. I am left humbled and my garden is left to restore itself over time.
Thursday, October 29, 2009
Sunday, October 25, 2009
Updated Pictures: October 23rd and 25th


ABOVE: Pictures taken Friday, October 23rd. All sweet pea seeds have sprouted and beet seeds have also started to pop up, although they are tiny. If you look closely at this last picture, you can see the redness of the stems and a few small green leaves at the top, fanning out.
BELOW: Pictures taken Sunday, October 25th.

Broccoli has gotten bigger!!

Sweet pea seeds at far right, by broccoli.

Sweet peas closest to the entrance of garden, by stalks.

Beet seeds have really progressed in just two days. I've made sure to keep the soil moist, well drained and soft. Soon, I will have to thin them out a bit.


My Winter Garden.

My garden breathes joy into my days. Upon arrival, I become intoxicated by its vibrancy, its sweetness and I am instantly transported into a positive space that brings a smile to my heart. It is the flame that lights my way through stress and daily responsibility, so that I may compassionately live a more balanced, peaceful life. Thank you garden!! I don't know what I'd do without you!
Sunday, October 18, 2009
Final Day #3 Step-By-Step Photos of Planting My Winter Garden 2009:


Planting my green bunching onions was fairly quick and easy. I loosened the soil, in order to aerate it and give plenty of room for the roots to easily grow deep down. They were very small starters and don't need tons of room as they mature, so I planted them about 2" down and about 5" between each bunch. NOTE: My only concerns are the sun exposure and moisture level, especially in the far left corner at the end. That area tends to stay more moist and gets less sun. I may have to water less, if I notice an issue arises.


Getting ready to plant my flat of Thumbelina Carrots! This is the designated space for my carrot patch. Although it is a bit shaded by 2pm, I still think they will be fine. Last year, I planted my carrot seeds in front of my trellis and the sugar snap peas on the trellis dominated the sun. However, my carrots survived, and with a little extra time and pruning attention to the snaps, they were wonderful.


Keeping in mind that my carrot size is 2" by 2", I made sure to dig deep (at least 6" or more), loosening my soil and planting at least 2 1/2" down and about 3" across. This will ensure enough room for ample growth.


The root system was roughly 2"-3" for each starter at planting time. My carrot patch!


So, I must be honest, last year I initially planted my beets 6" apart (like the package suggests) in this same space, planting a total of maybe 8 seeds. I realized eventually, that I could plant many more seeds depending on how large I wanted the beets to become. I then, added more seeds and learned to harvest as the season went on and thin out spaces, where it was needed. This ended up working out great. So, in all honesty, I did follow the package with planting the seed depth of 1/2" (as you can see my finger in the hole displaying this below), however I planted my whole package of seeds between these four separate rows created below. I definitely plan to thin out my rows as I go.


This is the food I've used for years. I usually dig it into my soil before planting, but this time since I was doing my garden in sections, I fed everything at the end. I usually do this at the beginning of a season and then the rest of the time, I am using my homemade compost and compost juice.

I took this picture to show how much my garden needed to be watered, even after the rain from this week. If you notice, the water is sitting on top of the soil (and did for 15 seconds or so), instead of soaking straight in. This is an indication of the soil being dry. It stopped raining on Thursday early afternoon and I didn't water until Saturday. I thought my plants would be fine, but in all honesty, the soil and plants were a bit dry when arriving on Saturday afternoon. The heat was so extreme after the rains, things dried quickly.


Street side bed entirely planted. Sweet Pea seeds have started to sprout as of Sunday, October 18th.


The inner bed completed using starters.

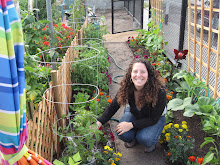
The completed Winter Garden 2009!!!
Saturday, October 17, 2009
Final Day #3 of Planting My Winter Garden 2009:

I am proud to say that this was officially the last day of planting my Winter Garden 2009!! So far, this experience has been very different for me! From planting my flowers first, to taking an entire week to get everything in, I have felt this truly is an experiment! And although I was hesitant at the beginning of my week, having to work with a different planting routine, I must admit, it worked out beautifully in the end! The midweek rain, into a high heat spell for the last three days has set all my flowers and leafy greens in wonderfully!!! It literally was the perfect time to plant! Just another reminder that everything is meant to be and after all the planning, you must let go and trust.
Today, I finished off my garden, focusing on root vegetables because the zodiac constellation in the sky is, Virgo, an Earth sign. I chose to plant carrots, beets and green bunching onions. Last year, I did carrots and beets by seed, (among many other veggies because it was hard for me to find a lot of starters that I wanted last winter) but I am looking forward to enjoying my carrots a bit earlier in the season because I luckily found starters. Unfortunately, they are not the carrot variety I would have loved, but nonetheless, they will be tasty and a great size for my son to chomp on. My beets I am doing by seed once again and I am thrilled to have them back in my garden. I LOVE homegrown beets!! They are SO yummy and sweet straight out of the garden! And the greens are so tender and easy to cook with, not to mention their amazing nutritional benefits! Last year, I did a stripped heirloom variety and this year I am doing the dark red Early Wonder. I will update you as I go to any differences, since I've done both by seed.
Intentionally, I chose to plant my carrots in order to ground myself and family through this huge transition of pregnancy, childbirth and first time sibling experience for my son. May their roots grow deep into the earth, keeping us sturdy through stormy times and giving us a solid foundation to move forward from. I planted my beets with the intention of passion and prosperity. Their rich, dark red color is so royal and sensual looking to me. The color feels like the Indian Goddess Lakshmi Durga, who signifies good luck. May we be showered with an abundance of necessities and have some extra time to indulge in creative endeavors that feed our souls. And lastly, I planted my green bunching onions for all the other parents (but, especially the mama's) out in the world. May they stimulate your energy and keep you moving in a positive direction with your children. Parenting truly is one big experiment! May you find patience in times of distress, breaks in times of exhaustion and laughter in times of tragedy.
I have to say unfortunately, with such little space, I can only plant so much. I wish I had more room to add an herb garden and continue to build my leafy green area and root veggies this winter. But, I do think spacing and aesthetics in a garden are just as important as your soil, watering techniques and placement choices. Especially spacing. You really need to be considerate of the plants mature size and give them enough room, in order to be successful. I think that can really set a new gardener apart from an experienced one. Less is more at the beginning because that allows your plants to eventually produce more in the end. If you try to squish tons of plants on top of each other to start, they have nowhere to expand out to. And of course, I am not only speaking of the plant on top of the soil, but more so the root system underneath. Breathing room is so important. I always find, when looking at my new garden at the beginning of a season, it feels like their is so much space unused. However, by mid to late season, that once barren feeling, is quickly replaced by a wild, jungle feel. That is why I like to start with clean lines and order because I know that it will soon mesh into a lush, tangled, dense paradise eventually.
Speaking of which, I plan to post pictures from previous seasons, so you can see my progress in the past as well. It really is exciting to see where you have come from and the potential of where it can go. Such a very gratifying process and experience. Almost as much as parenting a child.
I have visually documented my planting today in the next post, with step-by-step pictures. Enjoy!
Wednesday, October 14, 2009
Mid-Week Notes During Planting My Winter Garden 2009:
Although I have chosen to not plant fruits this season, I felt it necessary to share that today and up until tomorrow at 3pm, is the time to plant your fruits. Fruits include anything that produces a visual seed. That means, sugar peas, eggplant, cucumbers, tomatoes, peppers, beans, etc. According to the Biodynamic Sowing and Planting Calendar, the zodiac constellation in the sky today and tomorrow is Leo. During a fire sign, is the best time to plant your fruits.
I have decided that once I harvest my sweet peas on my trellis, I will plant sugar snap peas for the Spring. Last year, I did my sugar snaps by seed and they produced in abundance!! So much so, I am still a bit sick of them! :-) I think the entire family will agree, that we can wait until the spring.
I also want to share about the weather change in the last 24 hours. At about noon yesterday, rain began to fall. It was off and on all day, but by the evening, it was a steady down pour. Through the night, the rain increased. This entire morning it has continued without a break. Needless to say, my garden is officially SOAKED! I think this is wonderful for my seeds and starter root systems, because they need a moist environment to sprout and set into the soil. However, I am concerned with the flower blossoms. They tend to wilt in the heavy rain. It is safe to say, that I will not need to water my garden until at least Saturday, when I am there planting my roots.

This is how much water was collected in 24 hours in a vase outside
on our balcony. Keep in mind, that our balcony sits under trees, so I
would assume this amount is less inches than what has fallen in total.
Monday, October 12, 2009
Day #2 Step-By-Step Photos of Planting My Winter Garden 2009
 In my garden, ready to plant my Chard on Day #2. My focus is planting leafy greens when the zodiac constellation in the sky is in a Water Sign (Cancer).

 I dug about 6" down to give plenty of room for the larger root system because it is a big starter.
 Above, I took a picture of the Chard root system, in order to compare the difference at harvest time.
 I spaced my chard a little bit farther than needed, giving roughly a foot between each.

Day #2 of Planting My Winter Garden 2009:
I bet any mother out there could relate to the crazy day I've had!! First, it starts out with the discovery that my husband has taken all of my sets of car keys with him to work. Not only does this leave me stranded without a car, but it leaves me stranded without a stroller because we store it in the trunk. After dealing with that fiasco and resolving it, thanks to my parents letting me borrow their car and stroller (What would we do without grandparents?!), I rushed off to my 16 week doctors appointment, then headed to my garden to plant leafy greens, and finally zipped over to the market, since the family has to eat this week(and of course that is my weekly responsibility)! Needless to say, I'm exhausted!
But in order to stay true to this experiment, I made it to my garden to plant my Chard. Luckily, this is the only leafy green I have room for right now. In two months (at Chard's harvest time), I might replace it with Kale or Lettuce.
The zodiac constellation in the sky today is Cancer, although my Western Astrology Ephemeris says it has moved into Leo. Cancer is a water sign and so keeping to the Biodynamic Planting and Sowing calendar, water signs are the day to plant leafy greens. Logically that makes sense, when you think of what they are mainly made up of, it's water.
Now, I bought a larger start of 3 chard plants because that is all they had at the nursery. Last winter I did my Chard from seed. It took a while to mature, but it was well worth it. Maybe in the spring, I'll do some from seed again. But for now, I'm working with good size starters, which should make the process to our table faster and easier.
I planted the Chard with the spiritual intention to give myself and my family energy. May it build our iron and keep us charged. And, I do have to say, that although most of the day felt like a chore, this part of my day did not. It was like the one break I had. My neighbor at the garden also made my day by cutting 3 gorgeous roses and handing them to me. Yummy! They are sitting in a vase in my bedroom as I write.

I have visually documented my planting today in the next post, with step-by-step pictures. Enjoy!
Sunday, October 11, 2009
Day #1 Step-By-Step Photos of Planting My Winter Garden 2009


 My garden before planting the flowers on October 10, 2009.


Make sure to always thoroughly read and follow your packs and starter labels. VERY IMPORTANT!! I know that sounds like a given, but I'll admit that the first 3 years (at least) that I gardened, I would only look at what kind of sun the plant needed and left it at that. When working with seeds, it is most important to follow all information for best results. I also keep mine for the entire season, to refer back to.

 You can soak your Sweet Pea seeds in a bowl of water24 hours before, but it is not necessary. I mixed all the different types of Sweet Peas in my bucket, to assure a true variety when planting. I then used my finger to determine 1" of seed depth and pressed my finger firmly in the soil, creating multiple holes, 1" deep. I've found, the larger the seed, the easier to sprout. Sweet Pea seeds are a medium size, therefore it is fairly easy to grow from seed. I plan on thinning out my sprouts when they are 6" (optimum time according to the package), so I'm not too worried about my seed spacing.


After arriving to my garden, I quickly looked at the sun exposure and the time. At 2pm, my left side is already shaded, whereas my right side still has full sun. Unfortunately, my plan to mix Snap Dragons and Stalks will not work, because Stalks need full sun and Snap Dragons need full to partial. Because Snap Dragons are successful with partial sun, I chose to use them on my left side. I also thought about my Broccoli placement, as well as other plants that I am wanting to plant later this week (my leafy greens, roots and fruits). Broccoli is most successful with full sun, so I decided to plant it at the back end of my right bed.
With the plant placement of my Stalks, I tried to give about 9" across between each plant, however the diagonal holes are about 3". NOTE: This may be a concern later. I might have to spread them out by transplanting some of them later. Also, my boarder plant placement is way too close! Once I harvest my marigolds in a month, I will then spread out and transplant many of my Stalks. I've never grown Stalks before and I have two different varieties.


 After reading about a more successful root system by following a Biodynamic calendar, I thought it would be interesting to document the root system of my Snap Dragon and Broccoli during planting and then again during harvest time.

When digging, I use a shovel first and then always play with the depth of my hole with my hand. I have never wore gloves when gardening and I don't think I ever will. So much of the process is about getting down and dirty with Mother Earth.
My Broccoli spacing, three pictures below, is about a foot. VERY IMPORTANT for this flowering veggie to have enough room. They grow fairly large. NOTE: I have a concern with the Broccoli spacing of the two front plants in relation to the Stalk boarder. May not be enough room either. May need to be transplanted.


 Your watering technique, especially at the beginning of your season, with seeds and starters is SO IMPORTANT!! Above I have photographed how I water my flowers and flowering veggie. Try to avoid wetting the flower peddles and leaves as much as possible and also use a low water pressure. I really like using a hose nozzle, like you see here, where it almost emanates a shower of rain. I feel this has been more successful with my plants than just the regular hose nozzle.
Also, the constancy of watering is extremely important. In fact, their are some diseases that your plants can get, if you don't have a steady and constant watering routine. In the summer, with new seeds and starters, I water every 2 days. But in the winter months, we do get some rain, and so you have to equate that into your picture. Also, their is less daylight time, so you may be able to stretch it to every 3 days at the beginning. And I would suggest watering in the morning before noon, especially in the winter. In the summer, you can water in the morning before noon or after 5pm.


 My completed beds with all flower seeds and starters in. Wish me luck!!
 Below, the view of my garden from the street.
Subscribe to:
Posts (Atom)