Saturday, November 28, 2009

More Updated Pictures: November 24th


In the background, you can see the sweet basil I harvested on November 24th.


As you can see, the left side of my beet patch is growing at a significantly different pace, than the right side. Any ideas? Nutrient deficiency is my thought....using homemade compost to try and heal the situation.


Left side of beet patch, with broccoli.


Right side of beet patch, with broccoli.


Sweet basil is now gone. Harvested on November 24th. However, I left the Thai basil in, seen here, because it is still flourishing.

Monday, November 23, 2009

Updated Pictures: November 21st


After probably the most insane month of my year, I am finally updating all of you on the progress of my winter garden! About time! Enjoy the photos....


I began to tie the sweet peas up on the trellis about two weeks ago because they are getting lengthy enough. They are really starting to get thick and hearty stocks, which means they are happy!


The chard and green onions are also getting thick and well established into the soil. Soon, I will begin picking my chard and eating it, large leaves on the exterior first.


My beets and two broccoli plants flanking my beet patch have been quite interesting and I don't feel I documented the issue well with photos, so next time I'll take more. If you look at the picture below, the right side of my beet patch is flourishing, whereas the left side is not (didn't really get pictures of the left side). This was the same for the broccoli on the right versus the left. "What happened?", I've been asking myself for weeks as I watch the progression of one side and not the other. I think their must be a mineral deficiency. So, Wednesday, November 18th, I decided to take a gallon of concentrated worm compost juice and feed that area, along with the rest of the garden. I focused though on that area in particular with the concentrate, whereas the rest of the garden got a watered down half gallon. I did notice that by Saturday, November 21st (when taking these photos), the left side had improved and had grown a few inches. Next steps: Lay down some black worm compost soil in that area as well. And take photos of the left side! Sorry!


Below is a picture of my four broccoli plants on the end of the left bed. If you compare these Broccoli plants to the one 2 pictures up (on the right side of the beet patch), you can even see a difference in size. These Broccoli plants below are flourishing!


My carrot patch is doing great! I harvested a carrot early, just to see the progression and it was too small still, but so sweet already!


I think it is time to harvest my sweet basil. If you notice in these pictures, the stems have become almost "woody" looking and they are flowering on every top. Now that the colder weather has set in, the plants are losing quite a bit of leaves. Basil really flourishes in the summer time and I think it may be time to say goodbye.
However, my Thai basil plant is still doing great. I will keep you updated on its progression and take pictures of it next time I am at the garden.

Thursday, October 29, 2009

Weather Update from October 27th:

So, despite the magical Autumn feeling high winds can create, they also can create some serious damage. On October 27th, the winds whipped through the Los Angeles area at top speed!! It started at about 3pm and then escalated through the night. At one point (about 8pm), I was afraid our sliding glass door was going to be blown inward. Needless to say, I was heavily concerned about my garden the whole time and could not wait to get over there the next day, to check on what had happened.

When arriving at the garden on Wednesday Morning, October 28th, I instantly saw my trellis nearest the entrance, had fallen onto the stalks, fox glove and snap dragons on the other side. Initially, from the looks of things, I thought their was a lot of major damage. However, after removing the trellis and debris, I assessed the damage clearly and found things were not as horrible as I had anticipated.

The casualties were mainly snap dragon flowers and the fox glove. The fox glove in particular took the worst beating from the trellis. It was smashed pretty intensely and several flowers were crushed. I only lost about 3 stalks at the front though. And, all of my seedlings, even around the fallen trellis, were fine! Thank goodness.

I think the most disturbing part, after the flower damage, was the amount of trash and cigarette butts that had flown into my beds from the VW mechanics smoking on the street in front of my garden. City gardening. What can I say? You only have so much control when your in a community setting and then, add the fact that my garden beds are literally flush up against the street. This definitely equals the need for a lot of letting go.

And yet again, like in my first day of planting my winter garden writings, I am reminded that we only have so much control over our circumstances. Sure, we can research, plan and plot all we'd like about our pregnancies and gardens, but in the end, mother nature prevails. Her power greater than any mortal. I am left humbled and my garden is left to restore itself over time.

Sunday, October 25, 2009

Updated Pictures: October 23rd and 25th


ABOVE: Pictures taken Friday, October 23rd. All sweet pea seeds have sprouted and beet seeds have also started to pop up, although they are tiny. If you look closely at this last picture, you can see the redness of the stems and a few small green leaves at the top, fanning out.

BELOW: Pictures taken Sunday, October 25th.

Broccoli has gotten bigger!!


Sweet pea seeds at far right, by broccoli.

Sweet peas closest to the entrance of garden, by stalks.

Beet seeds have really progressed in just two days. I've made sure to keep the soil moist, well drained and soft. Soon, I will have to thin them out a bit.


My Winter Garden.

My garden breathes joy into my days. Upon arrival, I become intoxicated by its vibrancy, its sweetness and I am instantly transported into a positive space that brings a smile to my heart. It is the flame that lights my way through stress and daily responsibility, so that I may compassionately live a more balanced, peaceful life. Thank you garden!! I don't know what I'd do without you!

Sunday, October 18, 2009

Final Day #3 Step-By-Step Photos of Planting My Winter Garden 2009:


Planting my green bunching onions was fairly quick and easy. I loosened the soil, in order to aerate it and give plenty of room for the roots to easily grow deep down. They were very small starters and don't need tons of room as they mature, so I planted them about 2" down and about 5" between each bunch. NOTE: My only concerns are the sun exposure and moisture level, especially in the far left corner at the end. That area tends to stay more moist and gets less sun. I may have to water less, if I notice an issue arises.


Getting ready to plant my flat of Thumbelina Carrots! This is the designated space for my carrot patch. Although it is a bit shaded by 2pm, I still think they will be fine. Last year, I planted my carrot seeds in front of my trellis and the sugar snap peas on the trellis dominated the sun. However, my carrots survived, and with a little extra time and pruning attention to the snaps, they were wonderful.


Keeping in mind that my carrot size is 2" by 2", I made sure to dig deep (at least 6" or more), loosening my soil and planting at least 2 1/2" down and about 3" across. This will ensure enough room for ample growth.


The root system was roughly 2"-3" for each starter at planting time. My carrot patch!


So, I must be honest, last year I initially planted my beets 6" apart (like the package suggests) in this same space, planting a total of maybe 8 seeds. I realized eventually, that I could plant many more seeds depending on how large I wanted the beets to become. I then, added more seeds and learned to harvest as the season went on and thin out spaces, where it was needed. This ended up working out great. So, in all honesty, I did follow the package with planting the seed depth of 1/2" (as you can see my finger in the hole displaying this below), however I planted my whole package of seeds between these four separate rows created below. I definitely plan to thin out my rows as I go.


This is the food I've used for years. I usually dig it into my soil before planting, but this time since I was doing my garden in sections, I fed everything at the end. I usually do this at the beginning of a season and then the rest of the time, I am using my homemade compost and compost juice.

I took this picture to show how much my garden needed to be watered, even after the rain from this week. If you notice, the water is sitting on top of the soil (and did for 15 seconds or so), instead of soaking straight in. This is an indication of the soil being dry. It stopped raining on Thursday early afternoon and I didn't water until Saturday. I thought my plants would be fine, but in all honesty, the soil and plants were a bit dry when arriving on Saturday afternoon. The heat was so extreme after the rains, things dried quickly.


Street side bed entirely planted. Sweet Pea seeds have started to sprout as of Sunday, October 18th.


The inner bed completed using starters.

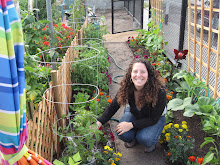
The completed Winter Garden 2009!!!